DIY Back to School Chalkboard Signs!
- Sidney Jones
- Aug 19, 2019
- 3 min read
Updated: May 16
Hi there! Thank you for visiting the blog. My mom and I completed this little weekend DIY for my niece and nephew's first day of school and they both turned out better than I could have wanted! A step by step of the process follows:
Materials:
Step 1: Chalkboard/Dry Erase Board - Lowes ($6.18)
Step 2: PVC Composite White Screen Molding - Home Depot ($2.52 x 2)
Step 3: Scotch Double Sided Clear Mounting Tape - Home Depot ($4.97)
Step 4: White Chalk - Hobby Lobby ($.99)
Step 5: SARAL PAPER SARAL White 12" X12' Wht Transfer Paper - Amazon ($13.11)
Step 6: Ubrands Liquid Chalk Markers, 4ct - Target ($4.89)
Step 6 Cont.: Imagination Station White Bullet Tip Chalk Marker - Hobby Lobby ($2.99)
Step 6 Cont.: Imagination Station Pastel Chalk Markers - Hobby Lobby ($9.99)
Total Project Cost = $48.16 including Hobby Lobby 40% off discount ($42.57)
Per board cost = $21.29
Tools Used:
Jigsaw
Miter Saw
(These both could probably be substituted with a miter box and handsaw to cut the board and trim)
Step 1: First I picked up a piece of Chalkboard/Dry erase marker board from Lowes. This was enough to make two 14"x20" chalkboards.
I then measured and used a jigsaw to cut my boards to size. I would recommend using a towel to rest the chalkboard surface on when marking and cutting to prevent scratching.
Step 2: I cut the boarder made of PVC Composite White Screen Molding with my miter saw, this could easily be done with a miter box and handsaw as well.

Step 3: I grabbed some Scotch Double Sided Clear Mounting Tape and cut about 5 small pieces for each side of trim. Super glue/hot glue would also probably work, but I found that the tape just simplified things and my ability to adjust the trim made things go smooth.
You should now have a finished chalkboard!

Step 4: Time for some seasoning! No, it's not the cooking kind!
You can do this by simply taking a piece of white chalk and rubbing the side (not the end) on the entire chalkboard surface. Using a paper towel or towel wipe the chalk over the entire board and again with a clean section wipe the board clean with the towel.
Step 5: Time to start writing...almost! This next step can be skipped if you are an expert chalkboard letterer or feel comfortable with your free handing skills. I on the other hand know I am not great at lettering. I first designed my lettering/words in Word, found some cute pictures online adjusted them to the right size and printed them to be able to easily trace them. Next I used some SARAL PAPER SARAL White 12" X12' Wht Transfer Paper to make the process easier.

To start, place the desired size transfer paper on your board and tape down. I cut out the same size as each printout and traced as I went so it didn't wipe off during the process. After, place your letter/word printouts and tape down over the transfer paper. Then get to tracing! I simply used a mechanical pencil to do my tracing.
Once you have your letters traced you can remove the paper and see if you like the position, if not that's ok you can wipe this off and try again! Once you have achieved your desired trace, use whichever marker you would like to finish the job!

Step 6: Now you're ready to letter! Take your desired marker and fill in those lines! If you happen to go out of them, no worries. A small paintbrush can help minor mistakes with the chalk markers. If you do make a mistake the marker should easily wipe off now that your board is seasoned and you can try again.
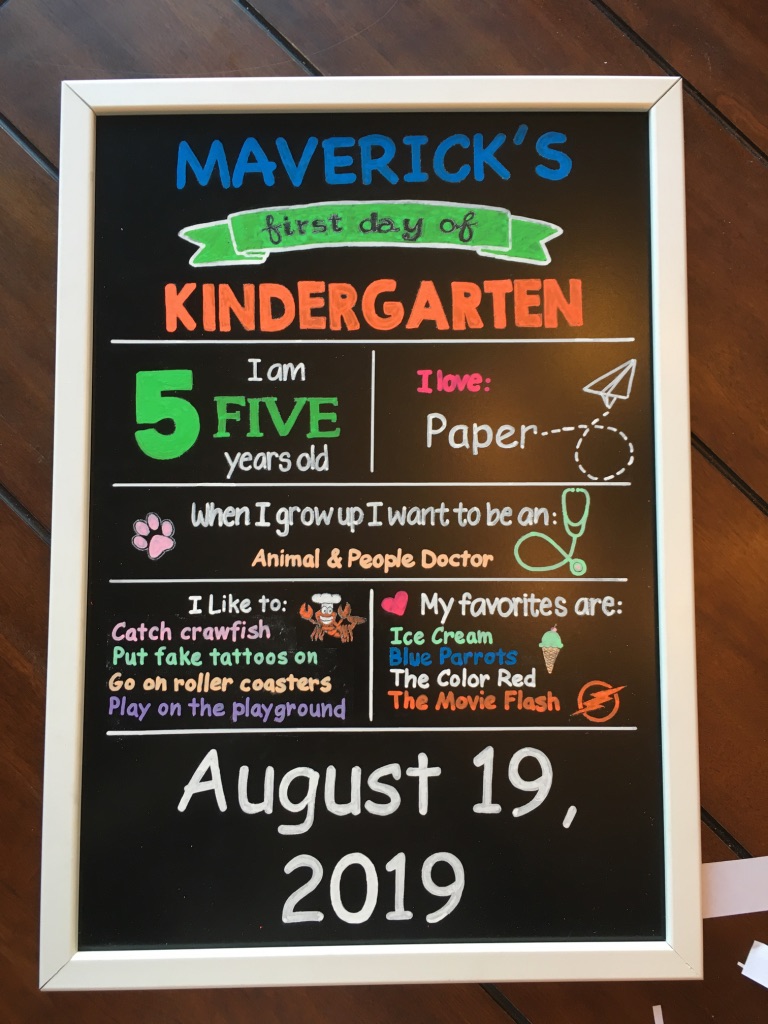
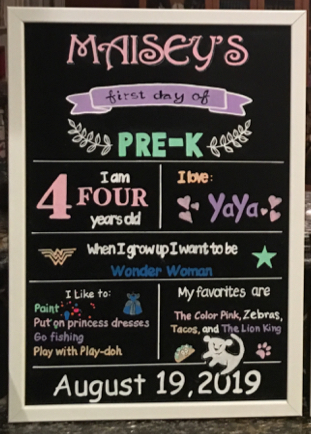
Here are our finished products!


Thank you for taking the time to read this and good luck in you chalkboard sign lettering adventures!

Comments